
How to Build a Serverless Website with reCAPTCHA on AWS
Build a serverless contact form on AWS with Lambda and Google reCAPTCHA to prevent spam without running a server.

This is based on my experience hosting my personal static site (adityacprtm.com) on AWS. I don’t want to run the server for just a ‘Contact Us’ form. Oh, and I also need a Captcha because I don’t want a lot of spam coming in. So I used a serverless site architecture and google recaptcha for that.
update personal site: adityacprtm.dev
Note: This article is a re-upload and a language translation, my original article can be seen in the link here.
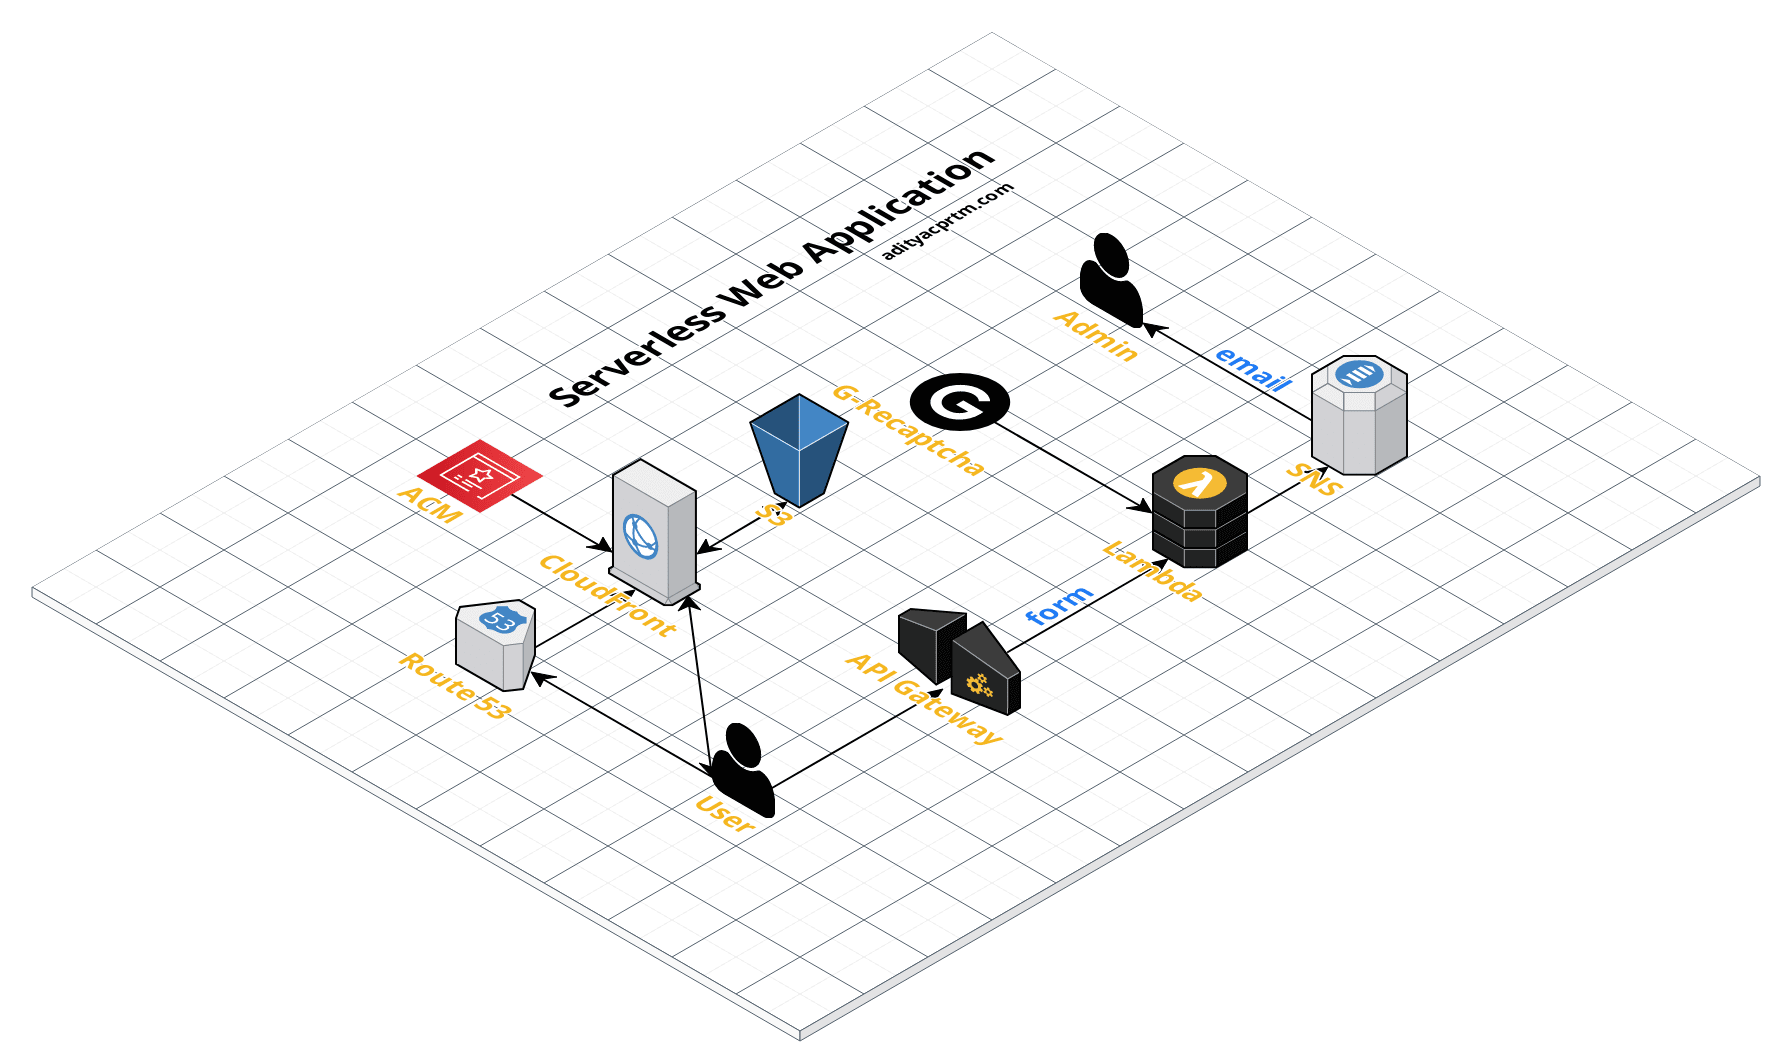
Application Architecture
Application architecture used:
- AWS Lambda
- Amazon API gateway
- Amazon S3
- Amazon SNS
- Amazon CloudFront 6.Amazon Route 53
- AWS Certificate Manager
- Google reCaptcha
Create Buckets on Amazon S3
- Open the console or access Amazon S3 here
- create a bucket with your domain name, for example example.com
- Enough at this point, we will upload the file later
Create SNS Topics and Subscriptions
- Open SNS Console or access here
- Create a name for the Topic
- Create a Subscription, select the ARN Topic according to what was made in point 2
- Select email on the protocol type, then create a subscription
- Check the registered email and verify the subscription from AWS
Build Serverless Back-end on AWS Lambda
- In the Lambda Console, select the create function
- Select Author from scratch
- Enter the name of the Function and select Node.js for the Runtime
- Then select Create function
At this point we will use lambda with JavaScript. Unfortunately we cannot easily load scripts into the AWS Lambda online editor which has external dependencies such as Axios. So we need to create a Node project with package.json like this:
code{
""name"":""contactForm"",
""version"":""0.0.1"",
""private"":true,
""scripts"":{},
""dependencies"":{
""aws-sdk"":""^2.560.0"",
""axios"":""^0.18.0""
}
}
We will use the environment variable in lambda to make things easier when there are changes to the SNS ARN Topic and the ecret Key of reCaptcha, change index.js as follows:
code'use strict';
const AWS = require(""aws-sdk"");
const axios = require('axios');
const completeUrl = ""https://www.google.com"";
// verify recaptcha url
const reCapUrl = ""https://www.google.com/recaptcha/api/siteverify"";
const reCaptchaSecret = process.env.RECAPTCHA_SECRET_KEY;
// from Amazon SNS
const snsTopic = process.env.ARN_SNS_TOPIC;
module.exports.handler = async (event, context, callback) => {
console.log(""Starting ContactForm Processing for website form."");
// console.log(""data event: "" + JSON.stringify(event));
// verify the result by POSTing to google backend with secret and frontend recaptcha token as payload
let verifyResult = await axios({
method: 'post',
url: reCapUrl,
params: {
secret: reCaptchaSecret,
response: event.captcha
}
}) // print out the result of that. Its a bit verbose though
// console.log(""verify result: "" + JSON.stringify(verifyResult.data));
if (verifyResult.data.success) {
let sns = new AWS.SNS();
// The structure of the email
let emailbody = ""Someone left a message for you.\n\nName\t\t: "" + event.name + ""\nEmail\t\t: "" + event.email + ""\nSubject\t\t: "" + event.subject + ""\nMessage\t\t: "" + event.message + ""\n\nThanks!"";
let params = {
Message: emailbody,
Subject: ""Contact Form: "" + event.subject,
TopicArn: snsTopic
};
// we publish the created message to Amazon SNS now窶ヲ
sns.publish(params, context.done);
// now we return a HTTP 302 together with a URL to redirect the browser to success URL (we put in google.com for simplicty)
callback(null, {
statusCode: 302,
headers: {
Location: completeUrl,
}
});
console.log(""End of the ContactForm Process With Success"");
} else {
console.log(""reCaptcha check failed. Most likely SPAM."");
callback(null, {
statusCode: '500',
body: JSON.stringify({
message: 'Invalid recaptcha'
})
});
}
};
After creating the project, we need to compress the folder in ZIP format for uploading to Lambda.
While still in the Lambda Console in the previously created Function, upload the ZIP and set the environment variables as follows:
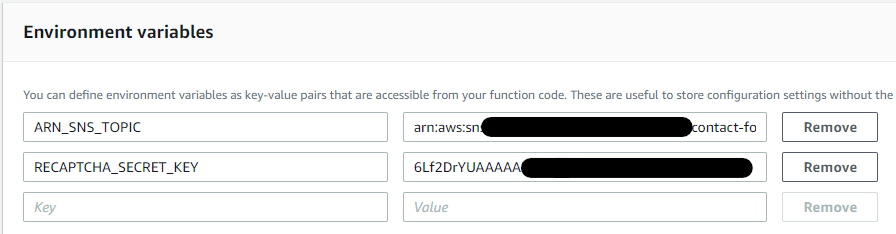
Then select Save.
Deploy Restful API Gateway
- Open the API Gateway Console or access here
- Select Create API and select REST
- Select New API and enter the API Name
- Select Create API
- On the left navigation, select Resources under your API
- From the Actions dropdown menu select Create Resource
- Enter a Resource Name such as contact or prod then click Create Resource
- On the newly created Resource, from the Action dropdown menu select Create Method
- Select Post then checkmark
- Select Lambda Function for integration type
- Select the Region you are using on AWS Lambda
- Enter the name of the function that was created before then Save
- [Optional CORS] In the newly created resource, from the Action dropdown select Enable CORS then click enable and replacing
- On the Actions dropdown menu select Deploy API, enter the Stage Name then select Deploy
- Write down and save the Invoke URL which will be used later
Set up a serverless website
Previously, you could use reCAPTCHA by registering a domain name here.
HTML
We are following the Google reCaptcha documentation, which means we have to enter the code below between the <head> and </head> tags.
code<script src=""https://www.google.com/recaptcha/api.js""></script>
and enter the following code at the bottom of the form before the submit button. Don’t forget to enter the siteKey you got after registering the domain on Google reCaptcha.
code<div class=""g-recaptcha"" data-sitekey=""xxxxxxxxxxxxxxxxxxx""></div>
JavaScript
We can use Ajax to perform asynchronous HTTP (Ajax) requests. Enter the Ajax URL with the Invoke URL we got when building the API gateway.
Host Static Website
- Back in the S3 Console, select the bucket that was created earlier
- Upload your website files into a bucket
- When finished, select the Properties tab
- Select Static website hosting
- Fill in the index and document error
- Make sure Block Public access is not checked
- Still on the Permissions tab, select Bucket Policy. Enter the following policy document into the policy bucket editor, replacing
[YOUR_BUCKET_NAME]with the bucket name that was created.
code{
""Version"":""2012-10-17"",
""Statement"":[
{
""Effect"":""Allow"",
""Principal"":""*"",
""Action"":""s3:GetObject"",
""Resource"":""arn:aws:s3:::[YOUR_BUCKET_NAME]/*""
}
]
}
Configure the Domain on Route 53
- On Amazon Route 53 we can register a new domain or make Route 53 a DNS service for an existing domain
- I already have my own domain, so I made Amazon Route 53 the DNS Service for my domain
- On the Route 53 Console, select Create Hosted Zone.
- On the Create Hosted Zone panel, enter the domain name
- In the Type, leave the default on the Public Hosted Zone
- Select Create.
Request SSL Certificate in AWS Certificate Manager
- Open ACM Console or access here
- select Request a Certificate
- Select Request a public certificate
- Add a domain name with your own domain name, for example
example.comor*.example.com - We need to validate the certificate request, how to select DNS validation or email validation. Here I use DNS validation because it’s faster and easier.
- Add a CNAME on Amazon Route 53 or simply click the button below your domain to add it automatically.
Create a CloudFront Web Distribution
- Open the CloudFront console or access here
- Create a distribution
- select Origin Domain Name with the bucket name created earlier.
- Select Redirect HTTP to HTTPS
- Select Yes in the Restrict Bucket Access section
- In the Distribution Settings, use the Custom SSL Certificate and select the certificate that was created in ACM
- Scroll and find Default Root Object, enter the default file Index.html
- Leave everything else default and create distribution.
- Wait until the status is Deployed, it usually takes a few minutes.
- Write down the Domain name from cloudfront
Using Custom Domain on Route 53
- Return to the Route 53 Console
- Select a domain that has been registered
- Select Create Record Set
- We will create 2 record sets
- The first is
example.comand the second iswww.example.com - Use A record and select the created CloudFront.
That’s it, we’ve built a serverless static website with reCaptcha protection and a notification for the owner or admin if someone sends a message on the form.
Reference:
- AWS Documentations